PLUMERIA

plumeria

LASDI ©

Remember when you tried to grow your bangs out, and there was that weird time where they were too short and not quite long enough? That’s how I feel about September. It’s not really Summer anymore, and yet, it isn’t Autumn just yet. But with the purple primrose, bluebells, and thistle growing wild along the highway, stonefruit in the full throws of its season, and the indecisive thermometer doing its own thing, September carries its own lovely label when it comes to food!

This meal carries it’s own uniqueness in that it uses turkey cutlets as the protein. The caramelized plums & purple onion take your palate to a different level, and serving it with roasted beets with crushed pistachios and warm citrus vinaigrette, as well as rosemary barely-smashed potatoes makes this meal one of the best September could offer! And just to add some more seasonal color, the potatoes were the baby potatoes with gold, purple, and red skins. BEAUTIFUL!

So go ahead and grow those bangs out…as long as you do it in September!

PLUMERIA

4 turkey cutlets (see notes)

2 tbs extra virgin olive oil (evoo)

sea salt, to taste

pepper, to taste

avocado oil (or some other high-heat oil)

4 plums, pitted and sliced

2 large purple onion, sliced

1/2 tsp clove

1 tsp brown sugar

1 cup broth of your choice

Set your oven to high broil. Place your cutlets together in a bowl and pour the evoo over them. Sea salt and pepper to taste and toss, coating each cutlet evenly. Place on a sheet pan and shape into a circle (see notes). Place under the broiler for five minutes, until lightly browned on top. Turn off the oven, allowing the cutlets to stay in there to rest as the oven cools down. Heat a heavy pan (I use my cast iron skillet!) on high heat until it is lightly smoking. Sprinkle enough avocado oil to cover about half the bottom of the pan, and lower your heat to medium. Carefully pour your onion into the pan, stir to cover with the oil, and let sit untouched for about two minutes. Sprinkle them with sea salt and pepper, and add your plums. Stir slightly so as to mix together and let cook for another two minutes. Sprinkle with the clove and brown sugar, stir and pour a slight bit of broth into the mix, then stir again. Allow to cook together until the broth is absorbed, continuing this process until all the broth has been used and the onion and plum have become a beautiful purple color, and has thickened, about ten-to-twelve minutes. Remove your cutlets from the oven and serve with a heaping helping of the plum-and-onion mixture on top.

NOTES: If you can't find turkey cutlets in your local grocery store, you can use turkey tenderloin or even chicken. If using the turkey cutlets, know that they come in a very weird shape, so pulling the two ends together on the sheet pan to form it into a circle will make them cook into that shape! They look very whimsical this way, especially once the vibrant mixture is on top! Perfect for Date Night at home, too!

BOLO BELLA

LASDI ©

The transition from summer to autumn is more than just a seasonal solstice change in my house.  Those of you who love Autumn best of all the seasons know exactly what I'm talking about.  It's a feeling.   And it runs DEEP.  It's in the air, it's in the colors, and it's in the food!

It's the season I love the most when it comes to cooking.  The switch from August to September is my hard line in the sand (pun intended), and I start to make the change without waiting for the official date.  This meal is one of my go-to's for that change, and it follows all the things I just spoke about: the smell in the air while you're cooking this meal will transition you into the time of year; the layers of burgundy, auburn, orange, and purple colors on the plate bring about the the genuine acknowledgment that this meal goes along with the transformation; and once you taste it, YOU KNOW FALL HAS ARRIVED!

This meal is perfect for Sunday Supper, Meatless Monday, the vegetarian or plant-based eater(s) in your life, or for any time while the season is in place!  Though I put it over low-carb pasta, it is hearty enough to eat without it.  

This does require just a smidge more work than the usual recipes I like to post, but it is worth every bit of it.  TRUST ME!

Eat every bite slowly, knowing the season will pass quickly, and enjoy the blessings of the seaon you're in!

EGGPLANT LENTIL BOLOGNESE

1 large purple eggplant

extra virgin olive oil (evoo)

1 large onion, diced small

4 stalks celery, diced small

4 carrots, diced small

8 oz pkg mushrooms, diced small

4 cloves garlic, minced

1 can tomato paste

2 tsp garlic powder

3 tbs fresh oregano, minced

3 tbs fresh basil, minced

3 cups cabernet (2 for the recipe, 1 for you to drink whilest cooking!)

1- 28 oz can petite diced tomatoes

1 pkg lentils, cooked

sea salt, to taste

pepper, to taste

Rub the eggplant lightly with evoo just enough to coat it in a thin layer. Wrap it in foil tightly and place in a preheated 375-degree oven. Bake until very tender, about an hour. Cook lentils according to instructions, draining any excess liquid left over.  Place eggplant and lentils aside to cool.  On a medium-high flame, heat a large, heavy saucepan (I use my cast iron Dutch oven!) for about a minute.  Pour enough evoo to cover the bottom and let it warm about fifteen seconds.  Add your veggies, a sprinkle of sea salt and pepper, and stir.  Brown the vegetables until caramelized and soft, about ten minutes, stirring about every two minutes or so. Add in the garlic powder and the fresh herbs, stir, and cook another minute or so.
Add the tomato paste, stir, and let cook another minute or so (see notes). Stir in 2 cups wine, diced tomatoes and stir.  Change your heat to low, and cook about five minutes.  While this is cooking, remove your cooled eggplant from the foil and scrape the insides from the skin onto a cutting board.  Mash with a fork.  Carefully add your eggplant and lentils to the pot, sea salt and pepper to taste, and continue to cook another ten minutes, allowing the sauce to thicken and marry.  Serve over pasta, if desired, and especially serve with a side of cabernet baby bella mushrooms and onions.

NOTES: when you add the tomato paste and stir, it may seem as though it is sticking to the bottom of the pan.  This is great!  Once you pour in the wine, scrape the bottom of the pan with a wooden spoon and get all that flavor into the sauce! 

CABERBET BABY BELLAS & ONIONS

extra virgin olive oil (evoo)

2 large onion (purple, if you want that depth of Autumn color!), cut in half and sliced

3- 8 oz pkgs baby bella mushrooms, sliced

1 tsp garlic powder

2 cups cabernet

sea salt, to taste

pepper, to taste

Heat a large, heavy pan (I use my cast iron!), on medium-high heat until it smokes slightly.  Pour in about 2 tbs of evoo, and add your sliced onion.  Stir the onion, evening it out and let sit for about two minutes, or until you see the bottom starting to brown, then stir again.  Add your garlic powder and stir again. Let sit another two minutes or so, add another 3 tbs evoo to the pan, then add your mushrooms and stir again, evening out the mushrooms and onions.  Stir about every two minutes, until the onions and mushrooms have a beautiful caramel color.  Add a half cup of wine and let cook until all the wine is reduced and absorbed by the mushrooms and onions.  Do this over again, a half cup at a time until all the wine has been used and is completely absorbed by the mushrooms and onions, and the mixture seems a bit creamy.  Add your salt and pepper, stir, (see notes). Serve with eggplant lentil bolognese!

NOTES: do not salt until you are almost ready to serve, as the salt will draw out liquid from the mushrooms and you will end up with a pan full of brown water instead of purple creamy goodness!

SQUASH IT!

LASDI©

LASDI©

Cooking is my love language to others. Food itself is one of my own love languages. I think this is so for most of us. This is the reason I wrote the book A Life of Flavor. It is a book about finding the joy in the dark times life brings us, with matching recipes for comfort. Everything we DO revolves around food, and for my family, we are usually talking about the next meal to come during the one we are sitting together for!

One of the things I really like to do for The Hubster is cook a Saturday morning breakfast. There are very rare times we have a free Saturday morning, so when we do, I like to express my love for him by making something awesome to commemorate the opportunity!

Also, because I want to keep him around for as long as possible, I try to make it as healthy as possible. I’m not ALWAYS able to do so - #RealLife - but do the very best I can. I am the low-carb girl of the family, so I also do my best to keep it that way for him, too. All of those things do not make for an easy-but-awesome breakfast.

Challenge. ACCEPTED.

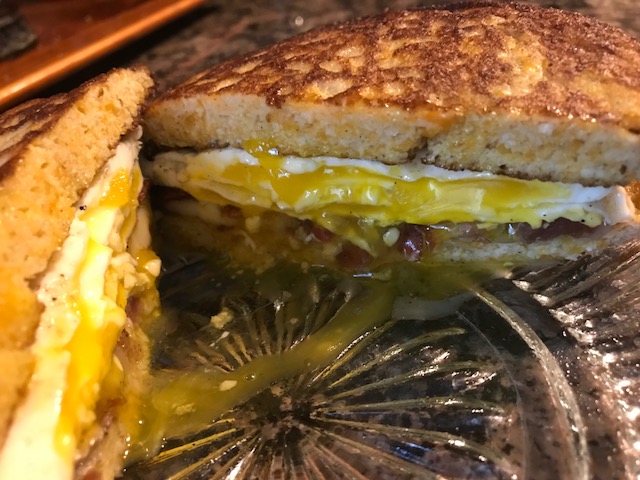
Here we have a bacon (uncured with no nitrates or preservatives, of course!), egg, and cheese breakfast sandwich. The clencher? The “bread” is butternut squash panny-cakes!! And boy-oh-BOY were they delicious and perfectly bread-like!

I know it is really easy to take a couple of slices of bread out of the package or whatever bread of your choice for a morning sandwich; hear my cry!! This is SO EASY, and SO WORTH YOUR HEALTH.

PS It is PERFECT for September as we transition out of Summer and into the Autumn season!

So try it! Let me know how you like it!

BUTTERNUT SQUASH PANNY-CAKES

2 cups butternut squash

extra virgin olive oil

1 cup almond flour

4 eggs

sea salt, to taste

pepper, to taste

1/2 tsp baking soda

coconut oil

For my butternut squash, I bought pre-peeled and cubed at the grocery store. It’s just easier and faster. I tossed them with a little bit of evoo and placed them on a baking sheet. I broiled them for about ten minutes until they were cooked through, and then put them into a standing mixer bowl. If you don’t have a standing mixer, a hand mixer will do just fine! Place all other ingredients up to coconut oil into mixing bowl and mix unil blended into a loose batter consistency.

Heat heavy pan (I use my cast-iron griddle, flat side!) without oil for about two minutes. Add about a tablespoon of coconut oil before each panny-cake prior to cooking, and adjust heat with each one accordingly. Ladle or pour desired amount onto pan and cook over medium heat until browned. Just like a regular panny-cake, when you see the bubbles on the upside, flip it carefully and cook the other side until brown.

NOTES: This was to be bread for the breakfast sandwich; however, if you would like a sweeter panny-cake, add 1 teaspoon of sugar to the batter and add your favorite syrup after cooking and prior to eating! I just squashed the bacon, egg, and cheese right between two huge pieces and watched it disappear with a smile on The Hubster’s face!