Let's Be Brie(f)

This image is © 2015 by Life As She Does It. Please link back or credit if any content or images are used.

This image is © 2015 by Life As She Does It. Please link back or credit if any content or images are used.

Oh, man.  I cannot TELL you how much this catering gig lit a fire under me!!  I had SO MUCH FUN doing this particular one because instead of a meal, it was a ton of apps for a ton of people.  And it was a SUCCESS!!  Among (many) other things, there was Teeny Tacos, Creamy Cake Truffles, Barbecued Meatballs, Stuffed Mushrooms, Pesto & Goat Cheese Stuffed Cherry Peppers, Shrimp in Texas Red Sauce, and so, soooooo much more.  One of the faves seemed to be the Streusel-Topped Baked Brie I made.  Considering the holidays, this is the recipe I'm sharing today.  It's so easy and very fast to make, but seems so sophisticated and like you spent all day in the kitchen!  I served mine with really hearty and rustic wasa crackers, but you can serve with whatever you like!  Happy Holidays indeed!

STREUSEL-TOPPED BAKED BRIE

1 full round of brie

cooking spray

1 cup pecan pieces

1/2 cup all-purpose flour

1/2 stick butter, softened

1/2 cup brown sugar

1/4 sugar

2 tbs pumpkin pie spice

1 tsp ground allspice

1 tsp ground cloves

Preheat oven to 350 degrees.  Gently cut the top of the brie round off and lay it back on top of the cheese from where you cut it from.  Spray a circular baking sheet with cooking spray and place the brie in the middle.  Bake for exactly twelve minutes.  While the brie is baking, combine remaining ingredients in a bowl and set aside.  After twelve minutes, take the brie out of the oven and sprinkle streusel mixture all over the top.  Bake another five minutes.  Take out of the oven and let cool completely.  Serve with crackers or just eat it with a spoon!  

NOTES: If any cheese runs out onto the baking sheet while cooking, you will be able to scoop it up in its entirety if you want to place it on a platter.  Simply place the crackers over it or for a rustic look, don't cover it up.  Let that melty-cheese look do all the talking! 

EGGPLANT PARMA-PARADISE

This image is © 2015 by Life As She Does It. Please link back or credit if any content or images are used.

This image is © 2015 by Life As She Does It. Please link back or credit if any content or images are used.

Look, I know some of you have an eggplant Parmesan recipe you swear by; whether it's your own or your mama's or your noni's or a coveted recipe passed down for generations.  But I'm here to tell you that this recipe is THE ONE -the holy grail of eggplant Parmesan - the GOLDEN TICKET TO EGGPLANT PARMESAN PARADISE.  For real, People.  FOR REAL.  This was fresh, organic eggplant picked on our Annual Fall Family Day.  And it will be forever the annual eggplant Parmesan recipe from here on out!!

EGGPLANT PARMESAN

3-small-to-medium-sized eggplant

grated Parmesan cheese

1 pinch sea salt

1 pinch pepper

1 tsp sea salt

2 tsp pepper

2 tsp cumin

4 eggs

splash of water

canola oil

shredded pizza cheese or mozzarella

1-48 oz can diced tomatoes, drained and split in two

1 can rotel, drained

Italian seasoning

1 bunch thyme

6 cloves roasted garlic, chopped fine

1 onion, chopped fine

This image is © 2015 by Life As She Does It. Please link back or credit if any content or images are used.

This image is © 2015 by Life As She Does It. Please link back or credit if any content or images are used.

Wash and dry your eggplant, and cut it into slices about 1-inch thick.  In a  bowl, take your eggs and whisk them like crazy.  Add a splash of water, a pinch of sea salt and a pinch of pepper and whisk again.  In another bowl, pour about two cups of grated Parmesan, and add your sea salt, pepper, and cumin and mix with a fork.  In a heavy pan (I use my cast-iron, of course!), pour about an inch of canola oil and heat on medium.  The oil is ready when you can put a tiny sprinkle of water in it and it sizzles.  Take a slice of eggplant, dip it in the egg-mix and then the Parmesan mix.  Put it in the hot oil and let cook about a minute-and-a-half on each side (until crust is hard).  Do not put more than four slices at a time so that they don't steam but get good and crunchy.  Place each one on a drying or cooling rack and continue to cook until all slices are done.   

This image is © 2015 by Life As She Does It. Please link back or credit if any content or images are used.

This image is © 2015 by Life As She Does It. Please link back or credit if any content or images are used.

In the same pan the eggplant was cooked in and on medium heat, place the thyme, roasted garlic, and onion and saute for about three minutes (see notes).  Remove from heat, take out the thyme sprig and discard,  and set aside the onion and garlic.  In a prepared baking dish, layer your cooked slices of eggplant, breaking apart a few to fit and cover the entire bottom of the dish.  Your next layer is the first half of the drained diced tomatoes.  Cover the tomato layer with your cheese and sprinkle Italian seasoning generously over the cheese.  Next, layer half the onion and garlic mix over the Italian seasoning and cheese.  Repeat layers, starting with eggplant and ending with the second half of the onion and garlic mixture, but in place of the tomatoes, layer the rotel.  Repeat for the last (third) layer, using eggplant, second-half of the diced tomatoes, and a heavy layer of cheese with a sprinkle of the Italian seasoning.  Bake at 350 for 30 minutes.  Let rest for five minutes.  Eat it up - I will feel your love from afar!!

NOTES: I had some leftover roasted garlic from the meal the night before.  You can either roast it yourself, buy it already roasted, or simply use regular garlic.  I use organic ingredients whenever possible for clean eating, and in this case, I believe it helped the eggplant flavor!  This is FANTASTIC for Meatless Monday AND it is low-carb, though it is so rich it sure doesn't taste like it!  Wanna see it happen fast-and-on-video on Life As She Does It's YouTube channel?  Click HERE

Squash It!

This image is © 2015 by Life As She Does It. Please link back or credit if any content or images are used.

This image is © 2015 by Life As She Does It. Please link back or credit if any content or images are used.

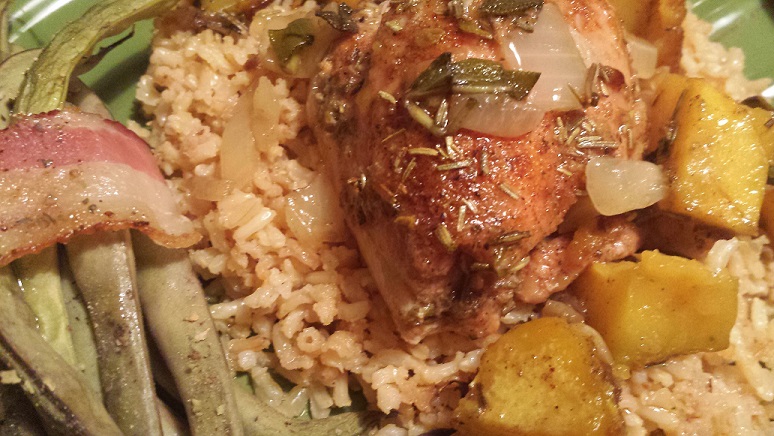
Like many of you, autumn is my most-absolute favorite time of year.  Part of our Annual Fall Family Day consists of vegetable picking as a family, and boy did I get a TON of squash!  So, for this particular dish, I cooked it up with some chicken thighs and the green-and-purple beans we picked wrapped in bacon (let's just say The Hubster was HAPPY!!)

CHICKEN THIGHS AND SQUASH

2 pkgs chicken thighs

extra virgin olive oil (evoo)

sea salt, to taste

pepper, to taste

3 cups squash, any kind, peeled and cubed

 1 onion, chopped

2 cloves garlic, chopped

3 tbs dried rosemary

3 tbs dried sage

2 tsp ground nutmeg

2 tsp sea salt

2 tsp pepper

2 cups vegetable (or chicken works here, too) stock or broth

1/2 cup parsley, chopped fine

In a large, heavy oven-safe skillet (I use my cast-iron, of course!), pour enough evoo to cover the bottom and heat on medium.  Meanwhile, sprinkle both sides of the chicken thighs with sea salt and pepper to your taste.  Place thighs top-side-down first into the heated pan.  Let sear and brown well before turning, about four-to-five minutes and the same on the other side.  Remove from heat and let rest on a plate covered in paper towel.  Heat your oven to 350 degrees.  To the same pan and on the same medium heat, add your squash, onion, garlic, rosemary, sage, nutmeg, sea salt, and pepper and stir.  Let cook for about five minutes, stirring occasionally.  Add your vegetable stock and scrape the bottom of your pan for all those goodie-brown-bits with a wooden spoon.  Turn off the heat and return the thighs to the pan, nestling them in between the squash mixture.  Cover and place the entire pan in the oven and let it braise by continuing to cook it for another 30 minutes.  Remove from the oven, sprinkle with parsley, and cover and let rest for five minutes.  Lift the lid.  Smell the wonder of autumn.  Then, eat the MESS out of it!

NOTES  I served this over brown rice and with the side of bacon-wrapped green bean stacks, but if you want low-carb, simply omit the rice.  


Horn of Plenty

This image is © 2015 by Life As She Does It. Please link back or credit if any content or images are used.

This image is © 2015 by Life As She Does It. Please link back or credit if any content or images are used.

I was asked to cater a small luncheon and with autumn upon us, I was super-pumped when they chose the Horn of Plenty Menu!  It consists of a stuffed acorn or carnival squash and a simple salad, from-scratch Shiner Bock beer bread with honey-butter rounds, and delicious cake truffles.  It made the house smell so wonderful and made me feel autumn deep in my soul!  I want to pass that along to you, so I am giving you the stuffed squash recipe below.  Happy Autumn Eating!

STUFFED ACORN SQUASH

 2 acorn or carnival squash, halved, seeded, and scraped deep and wide so as to fill generously, but still leaving enough squash flesh to eat

1 pnd ground beef

1/2 pkg bacon, chopped fine

1 onion, diced finely

2 green apples, cored and chopped finely

2 tbs pumpkin pie spice

2 tbs brown sugar

1 tbs dried sage

1 tsp sea salt

1 tsp pepper

2 cups Jasmine rice, cooked

Heat oven to 350 degrees.  Place squash halves cut-side down on a rimmed dish. Add water to dish and bake at 350 degrees 30 minutes.  While squash is roasted, cook bacon in a large nonstick skillet over medium heat until almost crisp. Add onion and apple. Cook an additional 5 minutes, stirring occasionally.  Stir in ground beef., breaking up meat as it cooks, and let it get just-brown.   Add brown sugar, pumpkin pie spice, sage, salt and pepper. Cook 1 minute. Remove from heat and stir in Jasmine rice.  Drain water from baking dish and flip over squash. Spoon meat-and-rice mixture into squash halves generously, pressing down with hands to pack it in. Return to oven and bake at 350 degrees for 20 minutes. Serve with fried sage as a garnish.

NOTES:  Want low-carb?  Omit the rice.  Be careful frying your sage leaves - if they turn brown they will taste bitter.  I used all-organic ingredients for clean eating, but I'm not sure it made a difference in taste except for the ground beef.  No need to make any sides, as this houses all of your food groups.  Horn of Plenty, get it?

She-cago Cubs

This image is © 2015 by Life As She Does It. Please link back or credit if any content or images are used.

This image is © 2015 by Life As She Does It. Please link back or credit if any content or images are used.

Though I am not a Cubs fan, I am a fan of Cubs fans.  One in particular happens to be my favorite person - The Hubster!  As we watched the possibility of Back to the Future's prediction in progress, we were invited to two of my other Cubs fan-favorites, Cody and her husband Joe.  My job was to take a sweet and a savory.  I did not don the Cubs gear; however, in support, I did fix up some Cubs eats!  I did cupcakes decorated with a Cubs logo, as you can see from the picture above, and also dressed up some antipasto apps to look like baseballs!  That is the recipe I provided you below......throw them together for your next sports party!

BASEBALL ANTIPASTO APPS

1 pkg 'everything' bagel thins, sandwich-size

1/2 pound hard salami, sliced at a 2 or 3

1 pkg sliced smoked provolone cheese

1 jar roasted red peppers, keep the liquid

2 tbs mayonnaise

2 tbs grated Parmesan cheese

Toast the 'everything' bagel thins until just crisp.  Mix the liquid from the jar of peppers, the mayonnaise, and the Parmesan cheese in the jar, close and shake well.  Spread very thinly and evenly on toasted bagel thins.  Place a slice of salami on top of the dressed bagel thins, and then layer a slice of provolone cheese.  Cut each roasted red pepper into thin slices to make the baseball 'laces', and layer according to the picture above.

NOTES: I use Boar's Head salami because it has no nitrates or MSG, and is minimally processed.  Also, as the low-carb girl, I simply eat this without the bagel thin and it is DELICIOUS!


FRANK-N-GHOST

This image is © 2015 by Life As She Does It. Please link back or credit if any content or images are used.

This image is © 2015 by Life As She Does It. Please link back or credit if any content or images are used.

Mix of the Sunday supper and the month of HALLOWEEN!!  And so it begins......

FRANKENSTEIN STUFFED BELL PEPPERS

 4  bell peppers, tops cut off in a jagged (or Frankenstein fashion), and seeded

1 spaghetti squash, seeds removed and roasted

1/2 red onion, chopped finely

1 jalapeno, seeded and chopped finely (or leave as many seeds as you like the heat!)

1 can black beans, drained

1/2 bunch cilantro, chopped coarsely

sea salt

pepper

2 tbs chili powder

2 tbs cumin

2 tbs garlic powder

juice of 1/2 lime

1/2 cup shredded cheddar cheese

extra virgin olive oil (evoo)

With a paper towel, rub the peppers and tops gently with evoo and set on prepared baking sheet and set aside.  Into a bowl, scrape the contents of the roasted spaghetti squash with a fork, the onion, jalapeno,  black beans, cilantro, all the seasonings, the cheddar cheese and the lime juice.  Mix well and scoop into the prepared bell peppers.  Set the tops on top (ha!) and bake at 350 degrees for 20-30 minutes, or until peppers are to your desired consistency.  Remove from the oven and let sit about five minutes.  Take a paring knife very gently and carefully cut eyes, nose, and mouth similar to the picture above.  Serve alongside ghostly autumn meat muffins below, or on its own for a great Meatless Monday!

NOTES:  Just in case you are unsure of the spaghetti squash, it is this easy to roast it: cut in half, seed and sprinkle with a little evoo, sea salt, and pepper.  Roast on prepared baking sheet at 350 degrees, flesh-side-down, for about 30 minutes and remove from oven.

GHOSTLY AUTUMN MEAT MUFFINS

2 pnds ground turkey

1 tbs sea salt

1 tbs pepper

1/2 tsp allspice

1/2 red onion, chopped and sauteed

1 egg

2 tbs red wine

1/4 cup oats

2 tbs extra virgin olive oil (evoo)

sliced Swiss cheese

Combine all ingredients down to evoo in a bowl.  In prepared muffin tins, pile the meat mixture into each muffin tin cup, and bake at 350 for 30 minutes.  Remove from oven and place one slice of Swiss cheese over each muffin and let sit for three minutes.  With a paring knife, slice around the ends of the Swiss cheese to fit each muffin, and carefully cut eyes and mouth into each slice similar to the picture above.  Serve your ghostly muffin alongside Frankenstein peppers for a ghoulish dinner party!


STAPLE IT - WITH A TWIST

20150824_183508.jpg

I am all about staples.  Some people have one, some have a handful.  They're the go-to's.  You know.....it could be your spaghetti and meatballs.  Or maybe it's the chili you make every winter.  Perhaps it is your mac-n-cheese with the recipe you got from your grandmother.  I have staples, too!  One of them happens to be mini-turkey patties with pan gravy over rice with a side salad.  It is definitely one of my go-to's in a pinch and a staple when I just can't think of something new to make. HOWEVER COMMA, this particular night I had some Asian leftovers to get rid of - and you know me and leftovers!!  So here's what I did: I made the staple, but with a twist.  I created a new-but-old-go-to-staple!  

This image is © 2015 by Life As She Does It. Please link back or credit if any content or images are used.

This image is © 2015 by Life As She Does It. Please link back or credit if any content or images are used.

MINI-ASIAN TURKEY PATTIES 

2 pnds ground turkey

1/4 cup oats

1 egg

1 tbs sea salt

1 tsp pepper

1 tbs garlic powder

1 tbs cumin

1 tbs Chinese five-spice

1/8 cup soy sauce

2 tbs extra virgin olive oil (evoo)

4 tbs extra virgin olive oil (evoo), for cooking

Mix everything down to second evoo in a bowl until just combined (see notes).  With the side of your hand, score the meat mound into eight equal parts.  Roll each one and flatten to a small patty.  Sprinkle the four tablespoons of evoo into a pan and heat on medium for one  minute.  Place four patties at a time into pan and cook for 8 - 10 minutes on each side, or until cooked through and brown on each side.  Let rest on paper towels and serve with pan gravy over rice.

NOTES: Do not mix too much or the meat can get tough.  I use organic turkey for this recipe and it does seem to make a difference in flavor.  I sauteed mushrooms and added atop the patty with gravy for a super-delish punch!

This image is © 2015 by Life As She Does It. Please link back or credit if any content or images are used.

This image is © 2015 by Life As She Does It. Please link back or credit if any content or images are used.

ASIAN BROWN PAN GRAVY

turkey patty bits and juices in the pan

2 tsp almond flour

1/2 tsp cornstarch

2 tsp brown sugar

4 tbs soy sauce

1 cup of your favorite broth (I use my home-made vegetable stock, but chicken broth works here as well)

sea salt, to taste

pepper, to taste

1 tbs butter

In the same pan the patties were cooked in on medium heat, pour almond flour, cornstarch, and brown sugar and cook for one minute.  Turn up the heat to medium-high, add soy sauce and broth and bring to a boil, whisking constantly until thickened.  Add sea salt and pepper.  Remove from heat, add butter and stir, and let sit one minute before pouring over turkey patties and rice.

This image is © 2015 by Life As She Does It. Please link back or credit if any content or images are used.

This image is © 2015 by Life As She Does It. Please link back or credit if any content or images are used.

This image is © 2015 by Life As She Does It. Please link back or credit if any content or images are used.

This image is © 2015 by Life As She Does It. Please link back or credit if any content or images are used.

NOTES:  I cooked the rice like usual, and once it was cooked just added a little diced red pepper,  soy sauce and Chinese five-spice.  For the salad, I used leftover baby bok-choy and Chinese radish and just added a little ground ginger and ketchup to some mayo and mixed it in with lettuce and green onion.  SO YUM.  And leftovers gone.  Waste not, want not!


ALL FUN & GAMES

This image is © 2015 by Life As She Does It. Please link back or credit if any content or images are used.

This image is © 2015 by Life As She Does It. Please link back or credit if any content or images are used.

Put together a game night for us and two of our favorite humans and just HAD to have some delish snackies.  So with leftover tuna steaks I made tuna-cakes, and with leftover ham, sun-dried tomatoes and 1/2 a bell pepper I made some bruschetta sammies (that's what I call them, anyhow), set out some cheese, crackers, and olives, and we had a full belly and a great time!  I've given you the bruschetta sammies recipe below.  DO IT.

BRUSCHETTA SAMMIES

1 brick cream cheese, softened

1/2 cup cheddar shredded cheddar cheese

1/2 bell pepper, diced finely

6-8 sun-dried tomatoes, diced finely

1 cup sandwich ham, diced finely

sea salt, to taste

pepper, to taste

1 tsp garlic powder

1 tsp ground coriander

1 tsp paprika

1 loaf of your favorite crusty bread, sliced into 1-inch slices and open-faced

Mix all ingredients down to bread.  Generously pile onto bread.  Eat.  Say YUMMM!!

NOTES:  Isn't is crazy that it's THIS EASY?!?